|
Adding a new Resource
|   |
|
Adding a new Resource
| |
This page steps through cataloguing standard resources in LibCode Suite. You may also be interested in the following instructions:
Please click one of the below links for instructions on cataloguing specific resources.
A Few Cataloguing Tips
Adding a Standard Record into LibCode Suite:-
Load the LibCode Suite menu and then go into Data Entry

The Cat. Detail Tab...
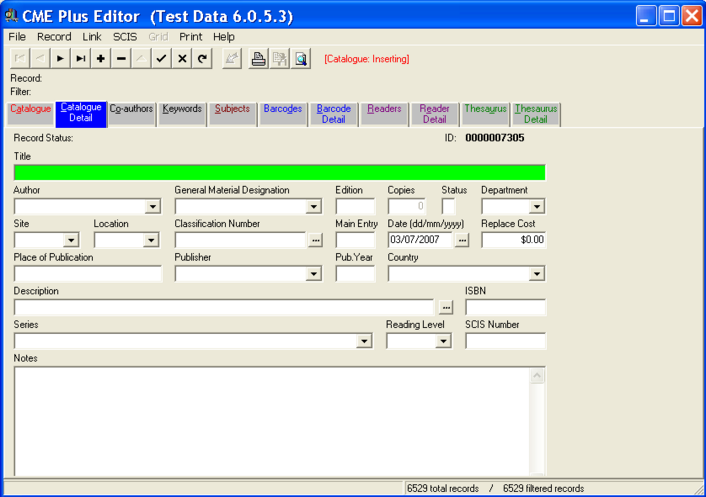
Field descriptions for the Cat Detail screen tab… (Alt+C = tab shortcut)
Title:
Type in the title of the resource (which for books is dead easy but for special resources you need to come up with a title that obviously identifies the resource):-
After pressing <F8> there might be some options:-
OR
Author:
Use Surname, comma, space, initial e.g. Dahl, R OR Surname, comma, space, given name e.g. Dahl, Roald
GMD:
General Materials Designation (or Description). This field is used to describe items other than books (e.g. KI for kit)
Edition:
Enter the Edition number eg. 3 for 3rd edition or Rev for Revised
Copies:
This field cannot be changed manually. As barcodes are attached to an item the number of copies is automatically adjusted to match the number of barcodes. False barcodes should be added if you are not actually using barcodes (the Accession Number written on the resource is a useful false barcode if you need one)
Status:
Marker field which is usually left blank. This field is very useful for marking records for a particular TEMPORARY purpose (for bulk updates and special reports it has proven useful)
The Department field is used to designate resources to particular Departments within the school. This can either be because they are located in a certain department or there are a certain department's books that are located in the library
Site:
The site is used for split collections. If there are resources stored in any part of the school other than the Resource Centre the site should be setup through Utilities so it can be used during Data Entry. You don't need to put any Site details on normal resources... researchers would normally come to the Resource Centre to find items but they do need to be told if resources are stored elsewhere...
Location:
R for Reference; F for Fiction; TR for Teachers... whatever is on the spine label. Location should be setup through Utilities to allow for Data Entry. Most schools don't use NF for Non-Fiction (only use NF if it is actually on the books otherwise it is inconsistent information... "go find the book with NF and 629.2 on the spine label"... fine if there is and NF on the resources, dodgy if you don't write NF on the resources!)
Dewey:
If Dewey number is known...
Type in the Dewey Number you already have in mind then press <F7> to view existing titles under that Dewey. This check of existing resources will help you be consistent with items already in your collection.
Finding a Dewey Number...
Checking technical details of Dewey...
Special considerations...
If there is a need to adapt the Dewey Field for another purpose please feel free to do so but make sure you record the details so other people can see what has been done and why...
For Example...
Teacher Reference - Fiction... TR is put in Location & F in the Dewey
Video Tape numbers are often put in the Dewey field because that is how they are stored on the shelf
Main Entry:
This is the technical name for the letters that appear on the spine label of resources, usually the first 3 letters of the Author surname. If there is no Author, the first three letters of the title are used. Technically, Editors are not Authors...
Entry Date:
Is the Date you typed the book's details in (which defaults to system date). The batch date is useful for checking data and is automatically updated if you edit an existing resource. This is particularly useful if you have Web-based catalogue to keep up-to-date
Place:
Town of Publication. The country is often entered here as well but there is a specific field for country of publication. Feel free to use one, the other... or both
Publisher:
Publisher of the resource. This field has a pop-up validation list attached which grows as you enter more data. To use the validation file, type in only the first few letters and select Publisher from list using the down arrow and enter or click on Publisher with the mouse
Year:
Year of first Publication or Year of Publication of this edition. It is often useful to know how old the information in a non-fiction resources is. In this case you would enter the Year of first Publication of Copyright year. Editions have their own date
Country:
The country the resource was published in. Choose from the list
Description:
May be used for collation of information or more useful purpose. Some examples of Description field comments are contents of kits (put more detailed information into the note field), number of pages and type of illustrations, etc. The number of minutes as well as Ratings for Audio and Video Cassettes should be entered here
ISBN:
Type in or scan the International Standard Book Number of the resource. This number can be used to order replacement copies of publications
Series:
For the Series of the resource. Many readers follow a series of books so the information is quite useful. This field has a pop-up validation list attached that grows as you enter more data. To use the validation file, type in only the first few letters and select Series from list using the down arrow and enter or click on Series with the mouse
SCIS:
Enter the School Cataloguing Information Services number if you have it to hand and if you think it will be useful at a later date. Data inloaded from SCIS downloads has this information automatically entered. For "Linked" records the word LINK appears in this field
Note:
This field can contain quite a large amount of text. Anything typed into this field can be searched via CMEPlus. The entire blurb on the back of resources can be entered if considered worth the time it takes
Press <F9> to save the record so far and click on the next tab you need…(or use the Alt + underlined letter to jump straight to it!)
The Co-Authors Screen… (Alt + O)

Field descriptions for the Co-author screen tab… (Alt+O)
Co-author:
Use this field to detail other people involved in resource production. Co-authors, Illustrators, and Editors should be entered here... new entry for each person
The Steps:
The Keyword data entry tab… (Alt + K)

Field descriptions for the Keyword screen tab… (Alt+K)
Keywords:
Use of this field is optional. Enter non-standard access points into this field. For example Themes, Curriculum Unit numbers, non-valid terms that are not suitable for addition to the Thesaurus... Do not use Subject Headings here... keyword searching does not have any cross-referencing abilities so keyword searches are not considered a normal search method and are a "dead-end" search
The Steps:
Click on next tab…
The Subjects data entry tab… (Alt + S)
(To add new Subjects to the list see “Adding Subjects to the Thesaurus”)
Click on + or press <F2> to add a new subject
The Subject add screen appears...
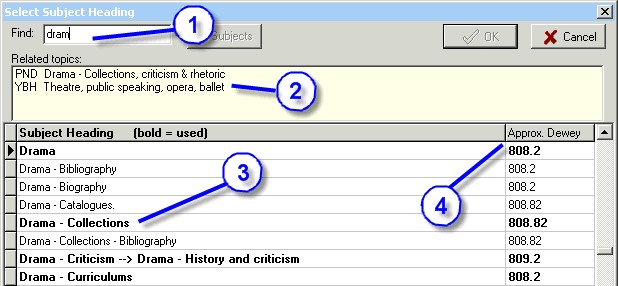
Field descriptions for Subject screen tab… (Alt+S)
Headings:
For assigning SCIS Subject heading as access points to resources
Steps:
The Barcode Detail tab... (Alt + B)
Click the + button to add a new entry (or press <F2>)
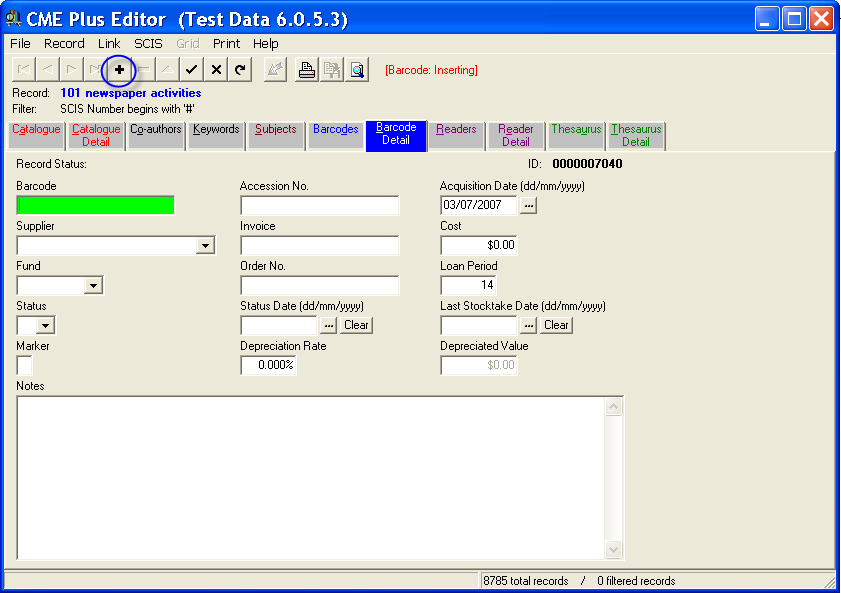
Field descriptions for Barcode Details screen tab… (Alt+B)
Barcode:
Type, wand or scan in the barcode attached to the resource. Libraries without barcodes can type in the accession number as written in the resource in place of a barcode if they wish to use the Circulation module without actual barcodes
Accn. No.:
This is the ACCESSION NUMBER field. Type in the prefix first and press <F8> or simply press <F8> for the last number used with that prefix to be displayed. You will need to increment this number by one. If you have an accession register, this number should directly correspond with the accession register number. Many schools use a year prefix then a number. (eg. 06-0001 could be the accession number of the first resource entered in 2006)
Acq. Date:
Date the resource was purchased (invoice date). Defaults to the current system date
Supplier:
Enter the abbreviated form or full name of the supplier. This field has a validation file attached which grows as you enter more data. To use the validation file, type in only the first few letters and select Supplier from list using the down arrow and <enter> or click on Supplier with the mouse
Invoice:
Enter the Supplier's invoice number which included the resource
Cost:
Enter the replacement cost of the item. You might want to put the actual cost in here if you intend to use it as a guide to what has been spent... budgeting is not the LibCode domain but it can be handy to be able to report the value compared to the cost. Replacement value is what we recommend you use here... money actually spent is for your accounting software / people!
Fund:
Section/department responsible for funding but can be used for other purposes. This field has a validation file attached which grows as you enter more data. To use the validation file, type in only the first few letters and select Fund from list using the down arrow and <enter> or click on Fund with the mouse... especially useful to keep track of special grant purchases
Order No.:
The school or institutions own Order number used to purchase the resource...might be useful to trace back at some stage
Loan Per.:
This is where the loan period for this particular copy of the resource is set. The default shown is set in Utilities / Setup / Loan Period...just type over it to make changes... multiple copies of a resource can have different loan periods if required
Status:
This field is used to explain Status Date. The drop down contains a Blank option, W for Written off, M for Missing, O for on Order. For larger libraries where there is a large time span between cataloguing and shelving of new resources the letter O in the status field can be useful to assist staff locate these resources. (Please remember to remove the “O” before it is put on display)... O = On order / being processed
Status Date:
Enter a date here to indicate when a resource was Written off, Found to be Missing or was Ordered
Last Stocktake Date:
This date indicates the last time the Stocktake module knows the resource was sighted in a stocktake. Date is entered automatically by stocktake Reconcile function
Marker:
This field is very useful for marking records for a TEMPORARY purpose. Lists of specific resources can be made via this field and it can be used for bulk updates...
Depreciation Rate:
Depreciation Rate is an annual percentage of initial purchase cost, used to calculate current value of resources for reports if you opt to include the Depreciated Value
Depreciated Value:
Calculated value using Cost, Depreciation Rate and Acquisition date
Notes:
Details of why a resource was Written off or any other comments specific to a particular copy of a resource. Anything entered into this field is displayed when this item is Lent out or Returned... Useful to enter reminders like “Check Battery is in bag” for a Video camera or “CD available if necessary” for a special resource...
The Reader Detail tab... (Alt + R)
Click the + button to add a new entry (or press <F2>)
During the Data Entry process, some resources often need extra information attached, such as Reading Scheme and Level data. Our new Reader Module enables the CME Editor to attach this extra information to a Catalogue record in a simple and easy way.
To add Reader Data to a record follow the below steps. But first ensure that you have entered all your Reading Schemes and Levels into the Authority Files in Utilities/ Setup/ Authority Files/ Reading Scheme/ Level.
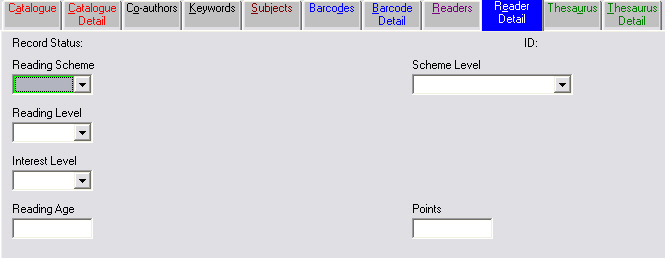
Reading Scheme - The scheme that this resource is used in/with E.g. Lexile, Accelerated Reader. Multiple schemes can be added by saving and returning to the 'Readers' tab, and following the same steps again.
Reading Level - The difficulty level of the resource
Interest Level - The interest level of the resource
Reading Age - The age of child that this resource is aimed at
Scheme Level - The level this resource is assigned by that particular Reading Scheme
Points - Any points that can be earned through this Reading Scheme for reading this resource
Click + or press <F2> to add a barcode and enter the Barcode, Accn No., Acquisition date, Supplier, Invoice, Cost, Fund, Order No., Loan Period and then <F9> to save. Repeat the process until all copies of that title are entered. Click the Cat Detail tab to check final details and click + or press <F2> to add another new record…
See Adding to the Thesaurus for details about the other two tabs you see on this screen