|
Adding a Set (Record)
|   |
|
Adding a Set (Record)
| |
To add a new Set (Record) click on the Data Entry button on the Text Tracker Suite Menu and then on the + button.
Entering the Set Details
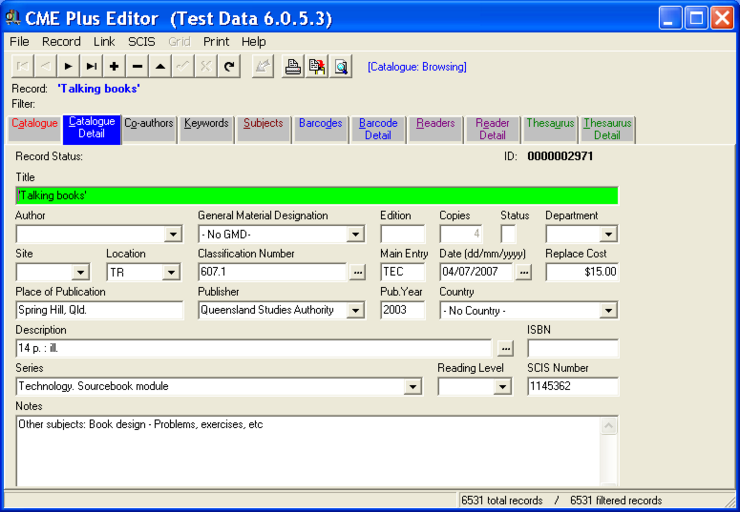
Fill in the details of the record being added -
If you place the cursor over each field you will be told (at the bottom of the screen) what information needs to be added.
Title
This is the actual Title of the book, do not begin the title with A, An or The
Author
As you begin to type in the authors surname you will be shown a list of names similar to what you have typed in. If the name is already in the list highlight it and hit enter. If it is a new name type it in correctly and hit enter and you will be asked if you would like to add it to the list.
General Material Designation
If the resource being added is NOT a book you enter a GMD. Click on the ‚ and you will be given a list of GMD's to choice from. This is a list of standard GMD's but feel free to add new ones. To use a new GMD's you will need to add it to the list using Utitilities / Setup / GMD.
Edition
In a Bookhire this information is very relevant. This is the Print Edition of a particular book eg Heinemann World Atlas 2nd Edition so you would key in 2 or 2nd.
Copies
This field cannot be altered. It is directly linked to the number of barcodes attached to this record.
Status
This field is left blank for future use as a filter
Department
This is the Department that this text is used by eg ENG - English or indicates which Building the item is stored in
Subject
Use this field to enter the subject that is dealt with eg DRA - Drama
Level
This is the Year Level that uses this resource 10 - Year 10
Shelf
It is a good idea to number your shelves. This will allow fast access to resources at all times.
Entry Date
This defaults in at todays date but can be altered by clicking on the ... at the end of the field. Don't forget all these pop-up calendars allow you to click on the Year or Month and use a scroll or drop down list to change the details
Place of Publication
Where the book is published eg LONDON
Publisher
Again this is a drop down list of currently used names. Either select from this list or accurately type in the new publisher name
Year Intro.
This is the year the Text was introduced to the school
Description
Type in the physical description of the book eg 156p.
ISBN
The International Standard Book Number. If you have downloaded the cataloguing data from SCIS the ISBN number will appear in this field. It can also be entered manually to assist with future ordering
Series
Select from the Series already entered or add a new one to the list
Number (User Field)
This field is left blank for future use. If you have a use for this field go ahead although you might like to ring us to discuss it first
Notes
This is where any additional information relating to this book can be added
Once all of the information has been added click on the √ button up the top or press F9 to save the changes. As you add information to each Tab sheet you will need to save the information although if you try to change screens and there is unsaved information on the page the software will warn you and ask if you want to save the changes before moving screens!
Co-Authors
If there are co-authors or illustrators worth noting this is where the details are added. Click on the + symbol to add details.
Keywords
This is where any non-valid keywords are entered. For example you may have a set of books that are used for specific task. Not to be confused with subjects, keywords are special identifiers that might be useful access points for people wanting to find text books or class sets useful for a particular area of interest.
Subjects
To add subjects click on the + and this screen will appear.
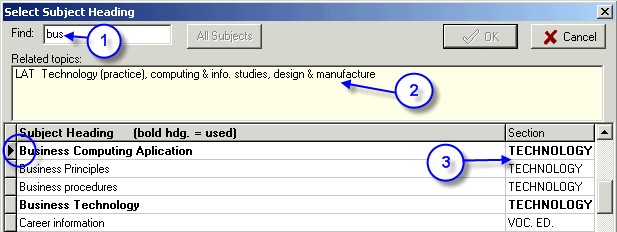
To add multiple subject headings simply highlight the heading and hit enter and the subject heading list will remain on the screen for you to select additional headings. If you only want to add one subject heading, double click on the heading and it will be added to the resource and then click the Cancel button (top right) to make the subject selection screen disappear.
See Adding a Barcode (Copy) for the next bit!