Marking Items Missing or Written Off
Previous Topic  Next Topic 

Firstly, to "Write off" a resource means to make it an inactive record in the system.  The data can stay in TextTracker for as long as you like but if you look up an item that has 25 copies and 4 have been "Written off" the copy count will display 21 copies.


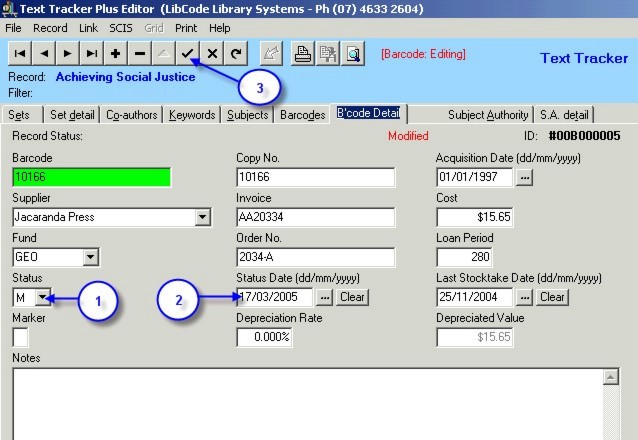
There is only one way to Write Off a resource and that is to put a W in the Status field of the Barcode for the item and then type in (or select) a Status Date to indicate when the item was Written off.


Marking a Single Item Missing or Written Off -


To tag or mark an item as Missing or Culled you will need to call up the relevant barcodes details screen of the item.


    1. On the Barcode Details screen select either M (Missing) or W (Withdrawn/Written-off) from the drop down list
    2. Click on the 3 dots at the end of this field and a calender will appear.  The default date is todays date but any date can be selected.  If you need to go back to a previous year click on the current year at the top of the calender and you will be able to move between years.
    3. Don't forget to save any changes that you make by clicking on the tick or using the F3


Bulk Write offs Using Barcode Buffer files -


You can create a Buffer File (Barcode file) of the resources you wish to edit in the catalogue.  Instructions for creating a Buffer File are in Utilities / Setup / Buffer File


This is handy if you need to write off resources that have nothing in common ie one or two copies from lots of different sets.  These books might be damaged or no longer relevant and will be replaced by newer versions.


To use the Buffer file for Write offs -


    1. There is no need to enter any selection criteria as you have already selected the records for editing (the Buffer File)
    2. Click on the Buffer File button and from the Browse screen locate your buffer file, highlight it and click on Open
    3. Check the number of records filtered at the bottom of the screen. 
    4. In the Replacement field select Status from the drop down list and in the Replace with field put in W, now click on the Replace button
    5. You will now have to repeat steps 2 to 4 this time select Status Date as the Replacement field and in the Replace with select todays date from the calender
    6. Click on the Replace button, you will be asked to confirm this update.
    7. Once you have completed your updates you will need to use the Utilities / Update / Reset Copies.  This will adjust the number of available copies in the Catalogue screen with the actual number of available barcoded records. This function should be performed when ever there have been bulk changes made barcode details.


Here are a few more attempts to describe this function:-


Writing Off Resources Manually


Writing off using a zapped in list of barcodes (buffer file)

    1. Go into Utilities / Update / Barcodes
    2. Click the buffer file button in the Selection criteria area and find the buffer file you created
    3. Click Apply button to see the resources displayed in the data grid... check these are the records you want to Write off and, if you are confident, drop down the Replacement Criteria list and select the Status field
    4. Type a W into the Replace With box and click Replace button
    5. Once that's complete, do it a second time and select the Status Date as the Replacement field this time... set todays date as the Replace With information
    6. Now go and check for yourself that the details are ok by looking up one of the barcode in the Data Entry module and check that the Status and Status Date are set correctly
    7. If all is well and you have finished bulk updating for now you should go into Utilities / Update / Reset Copies to let the system go and check that the number of copies on the main data entry screen accurately reflects the number of "active" barcodes on an item


Writing off resources using the Update function in Utilities

    1. Do a backup just in case you need to undo your changes
    2. Go into Utilities / Update / Barcodes
    3. Drop down the Selection criteria field list and select ID (cat)
    4. Type the ID number details into the Low value and High value fields and click Apply
    5. Check the items list in the data display grid
    6. If you are happy that they are the items you want to Write off then drop down the Replacement field list, select Status and type a W into the Replacement value box
    7. Click Replace and do another update using the same criteria to change the Status Date field for the records to todays date
    8. Go and check a few of the actual barcodes in Data Entry and if you are happy go into Utilities / Update / Copies reset to make sure the number of copies displayed on the main data entry screen accurately reflects the number of "active" barcodes attached to it


Writing off items automatically after a Stocktake

One of the functions of the Stocktake is to Write Off resources.  There are changes being made to this function so this entry will be updated with the release of version 4+.