|
Stocktaking with Text Tracker Suite
|   |
|
Stocktaking with Text Tracker Suite
| |
Stocktaking with Text Tracker Suite...
The dreaded stocktake... there aren’t that many steps involved in the Stocktaking process but when you are dealing with 20,000 + items it’s a big job. The stocktaking process in Text Tracker Suite has been designed with portable barcode scanners in mind since this is the fastest way to do a stocktake. We have added several features to make Stocktaking a little easier but have not yet added anything to make it more fun (mostly because there are probably laws against broadcasting frequencies that stimulate the pleasure centres of the human brain!… any other suggestions however are most welcome!)
The Stocktaking process…
(Circulation / Stocktake / Add...)
(If you do need to adjust details of a record you can jump into the Data Entry module while viewing this report...)
(Utilities / Stocktake / Report / Loans Found... keep same parameters from step 3.)
(Utilities / Stocktake / Mark missing... keep same criteria as Step 5)
In step three above, you need to set Stocktake Parameters. This can be a little daunting the first few times so here is an explanation of the Stocktake Parameters screen...
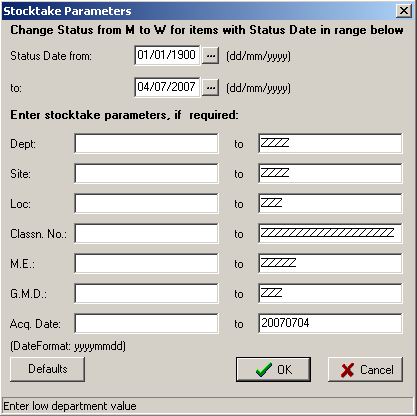
A Special Note:
The Stocktake Parameters set in Stage 3 are only for visual comparison of the data you have zapped to the existing catalogue of resources. This screen has been included so you can check your data entry consistency so it does not matter if you don’t get it right the first time.
Each field on this screen allows you to set a Range of possible values... Low Value to High Value. Lets look at the Department displayed on the screen shot above as an example...
Department “ ” to ZZZZ means Site should be anything between Blank and ZZZZ (which is the highest possible value for a Site field entry) so this describes ALL resources. If you put Department: SCI to SCI then the Department must be equal to SCI for the record to appear as being shelved correctly... make any sense?
Just go ahead and set some crazy parameters and see what happens... the best way to understand these settings is to experiment!